Before We Start
In this series of guides we’ll be using the free and open source desktop platform, QGIS to prepare our data / maps for publishing. Before we start, we’ll first setup QGIS.
QGIS version
Ensure you have the latest LTR (long-term release) of QGIS (3.4.x at the time of writing). You can download QGIS from here if not.
Mappin access
When you signed-up for Mappin you will have received the following information:
- Mappin URL e.g. you.cloudmappin.com
- Mappin admin URL e.g. you-admin.cloudmappin.com
- Admin password (password for the user admin at the above URL)
- Mappin postgis URL e.g. you-postgis.cloudmappin.com
- Mappin postgis port e.g. 5432
- Postgres password (password for the user postgres at the above URL)
Ensure you have this information handy.
Configuring PostGIS
Mappin stores its published vector data (e.g. polygon data) in an internal PostGIS database. We will now configure a connection to this database in QGIS. This connection will be used in QGIS to upload data for publishing.
- Open QGIS
- Select Layer > Add Layer > Add PostGIS Layers
- Click New
- Enter these details as shown in the image below:
- Name: Mappin
- Host: YOU-postgis.cloudmappin.com (where YOU is your customer ID)
- Port: your **Mappin postgis port* as mentioned above*
- Database: postgres
- SSL mode: disable
- Username: postgres
- Password: your **Postgres password* as mentioned above*
- Save Username and Password: enabled
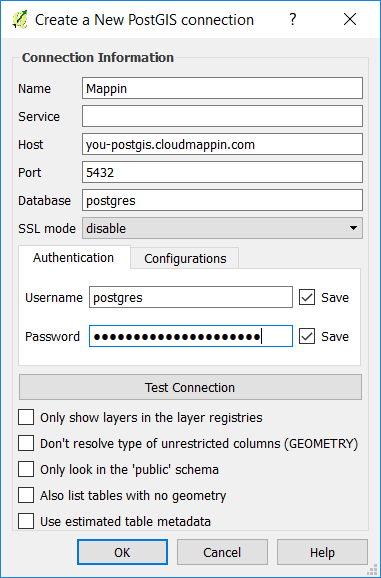
- Click Test Connection to check whether the settings have been entered correctly
- Click OK, then click Close
A PostGIS connection to Mappin has now been configured in QGIS.
Configuring WMTS
Mappin provides a tile-based WMTS (Web Map Tile Service) which provides national background mapping for the UK. We will make use of this service to provide contextual mapping to our published data. Let’s configure the WMTS connection in QGIS.
- In QGIS, select Layer > Add Layer > Add WMS/WMTS Layer
- Click New
- Enter these details as shown in the image below:
- Name: Mappin WMTS
- URL: http://wmts.cloudmappin.com/mapproxy/wms?tiled=true
- Ignore GetMap...: Checked
- Ignore GetFeatureInfo...: Checked
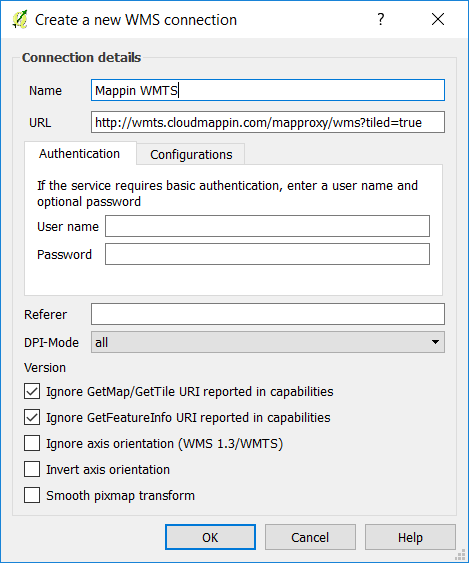
- Click OK, then click Close
Mappin’s WMTS service has now been configured in QGIS.
With QGIS now configured properly, we can now publish our first map.